So, you’ve decided on a blog name and are ready to start building your new website. What’s the next step? We purchase the domain name and set up your hosting!
See if your domain name is available
I recommend going on Namecheap.com and plugging in the names you had in mind, and they will let you know which ones can be registered, and their prices.
You CAN purchase your domain here (which is what I do) but this means that there’s an extra step involved when setting up your website.
For the sake of keeping things easy, we’ll just buy the domain name from the hosting company, which we’ll talk about next!
Buy your domain and hosting from Siteground
What is hosting?
Hosting is basically where your website will live. It’s like the website is the home, and the hosting is the land it’ll be built upon.
What’s the best hosting for a WordPress blog or website?
I’ve tried a bunch of different hosting companies; Bluehost, Green Greeks, but my favourite is SiteGround. I’ll show you how to get your blog started with them!
First, go to the Siteground website, and click on the “Web Hosting” tab at the top. It’ll take you to a page like this:
 Since this is a brand new blog and you won’t have too much traffic in the beginning, choose the first and lowest priced option. You can always upgrade later on.
You’ll be taken to the following page:
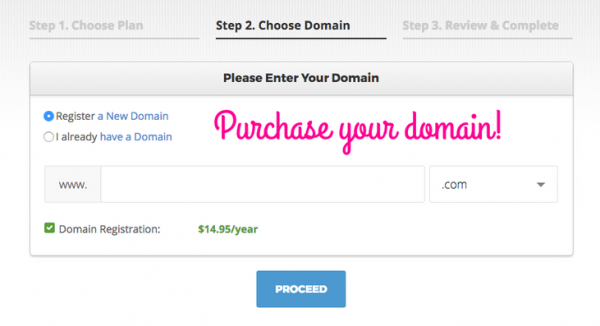 You’ll be asked to register a new domain. If you haven’t already purchased your domain name, do so here. It’ll save you the hassle of setting up the nameservers (if you buy from another company).
Follow the instructions to checkout, which should be straight forward.
Once you’re signed in to your Siteground account, we’re going to install WordPress for your website!
With Siteground, they give you free SSL certificates for your domains. Get on Livechat to have them help you apply the SSL to your domains you go on to the next steps.
What the heck is WordPress?
Remember how I said that hosting is like the land your your website (home) is going to sit on? WordPress is like the wooden frame or foundation of the house we’re building.
We’re going to sign in to SiteGround account, and click on the “My Accounts” tab at the top:
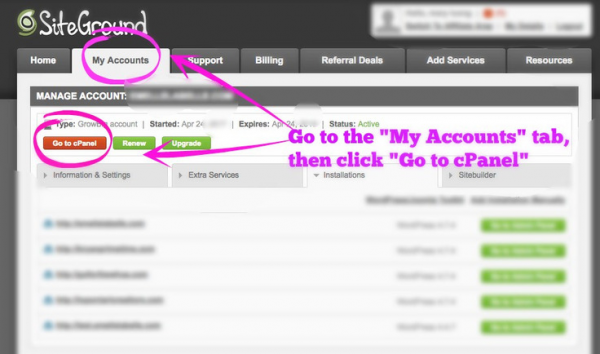 Then, we’ll be taken to a screen that looks something like the one below.
Scroll down until you see “AUTOINSTALLERS” and click on “WordPress”
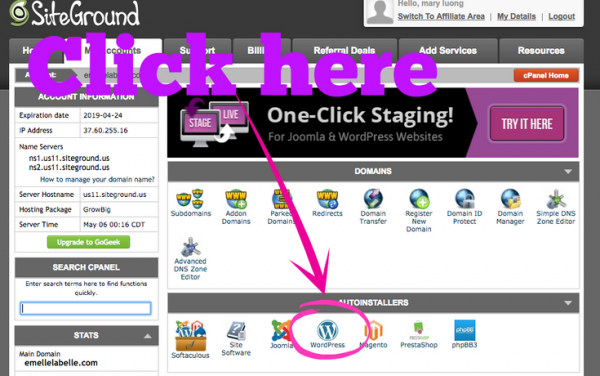
Now, before the installation starts, you just need to choose a few settings.

Be sure to remember which version you choose!!
www.yourdomain.com vs. yourdomain.com.
Choose https if you have the SSL installed for your domain (I got the live people to do this before I started)
The other settings you need to keep an eye out for are the following: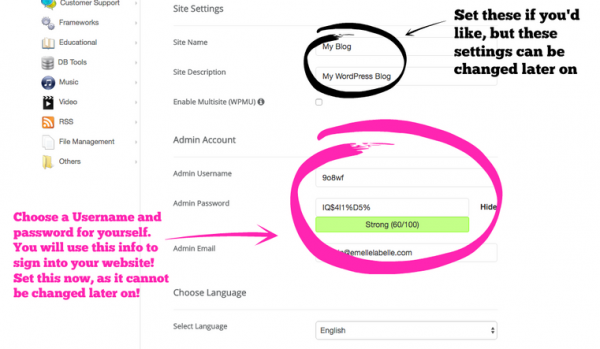
The site name and site descriptions can be changed later on, but you can set these now if you’d like.
You MUST choose an admin username. This is the username you use to sign into your website. Make sure you keep this name and password in a safe place!
And that’s it! You should get an email stating where to login to your website (usually it’s something like www.yourdomain.com/wp-admin) Sign in and start messing around with some settings! Get familiar with the interface.
Choose a theme for your blog!
So, WordPress is your foundation. A theme is all the bells whistles that you add to make your house a home!
I am currently using The Voux theme and I love it! It has a drag and drop feature that I find very easy to use.
Another popular theme is Divi, which I’ve used on some other websites, and found really easy.
My go to for premium (paid) themes is Themeforest.
In your WordPress Dashboard, go to Appearance>Themes>Add New to see some free themes.
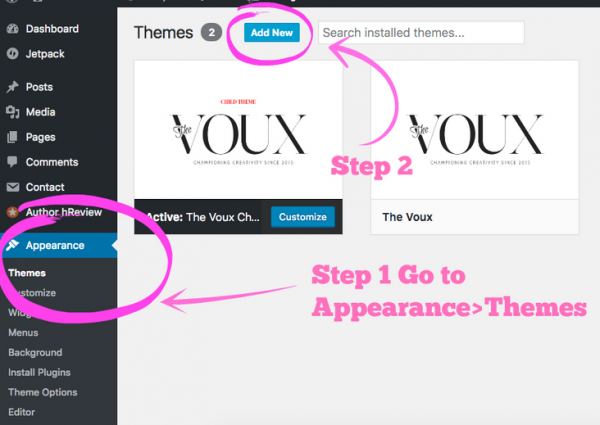
You can also Google up “Free wordpress themes” and find one for free that you like.
A theme doesn’t have to be super fancy. I actually prefer simpler, cleaner themes myself. Just go with what you like and what clicks with your style.
Phew! YAY! You officially have your blog!
Next, you need to set up some important pages and plan out your content calender
